
WORKSPACES
What if every creative tool is really just a room full of toolboxes — and knowing where to find the right toolbox is half the skill?
CORE CONCEPT
IMPORTANCE OF WORKSPACES
KEY KNOWLEDGE
1
Every creative tool has a workspace with common elements: canvas, toolbar, panels, menus, and navigation

REAL WORLD EXAMPLE
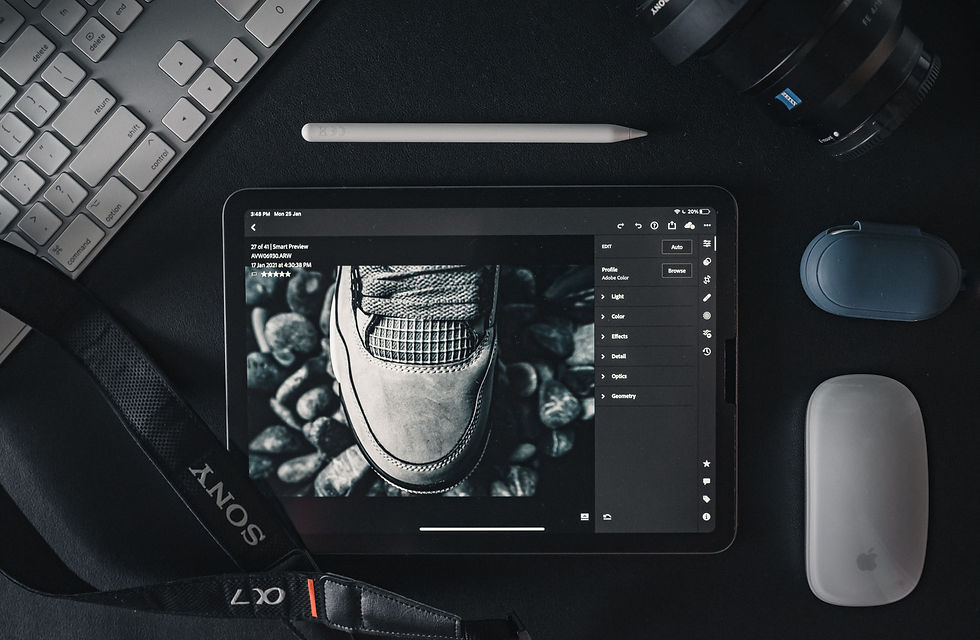
A creative tool's workspace is just a digital room. And like any room, it has the same basic furniture no matter whose room you walk into — a table, a chair, a cupboard, a window. Same idea here. Every creative tool has: a canvas (the central area where you make stuff), a toolbar (the tools), panels (the side menus), and main menus (file, edit, etc.) at the top. Once you spot these four pieces of furniture in any tool, you immediately know your way around — even if everything else looks new and intimidating.
2
Canvas: the main area where your work lives and where you create

REAL WORLD EXAMPLE
The canvas is the empty space in the middle of the screen — it is where your design, photo, or video actually appears. Think of it like the desk inside a workshop. All the tools live around the edges, but the actual work happens on the canvas. Whether you are using Canva, Photoshop, or CapCut, the canvas is the same idea — your stage, your playground, your creative empty space. Every great creative project starts with looking at a blank canvas and not being scared of it.
3
Toolbar: the set of tools for drawing, selecting, typing, moving, and transforming elements

REAL WORLD EXAMPLE
The toolbar is the row of small icons usually on the left side of the screen — paintbrush, text tool, selection tool, shapes, eraser. Each icon does one thing. Once you know what each tool does, you start using them naturally, the way you switch between pen and pencil and eraser without thinking. New designers click slowly through the toolbar reading every tooltip. Pros barely look — their fingers fly automatically. The toolbar is where speed comes from.
4
Panels: side sections showing properties like colour, layers, text settings, and effects
REAL WORLD EXAMPLE
Panels are the side sections of the screen, usually on the right — they show settings, layers, colours, effects, and properties. When you select a layer, the panels on the right tell you everything about it: its size, opacity, font, colour. Panels are like the dashboard of a car — they show you what is happening and let you adjust it. Designers customise their panels constantly, hiding the ones they do not need and pinning the ones they use most. A clean panel setup is the sign of a focused mind.
5
Menus and Timeline: top-level options for file management (save, export, undo) and advanced features.
REAL WORLD EXAMPLE
At the top of every creative app, you find menus — File, Edit, View, Window, Help. These are like the manager's office — saving, opening, exporting, undoing, all the big deal stuff lives here. And in video editors and animation tools, there is one extra workspace element: a timeline at the bottom. The timeline shows time horizontally — your video clips, music tracks, and text appear as bars stretched across it. Most designers work on canvas. Video editors work on canvas AND timeline. Time is just another dimension to design in.

6
Keyboard shortcuts dramatically speed up work — learning common ones (undo, copy, paste, save) is valuable in every tool.
REAL WORLD EXAMPLE
Watch a professional designer work — their hands barely touch the mouse. Why? They have memorised keyboard shortcuts. Ctrl+Z to undo. Ctrl+C to copy. Ctrl+V to paste. Ctrl+S to save. These four shortcuts alone save hours every week. Every tool has more — pressing 'V' for the move tool, 'T' for text, 'B' for brush. Learning even five shortcuts in any tool you use will instantly make you twice as fast. Keyboard shortcuts are the difference between dragging through work and dancing through it.

7
Customising your workspace (arranging panels, setting preferences) is something every professional does to fit their workflow.

REAL WORLD EXAMPLE
Imagine if everyone had to use the same desk, same chair height, same notebook layout. Some would be uncomfortable. Same with creative software — everyone's brain is different, so everyone arranges their workspace differently. Pros customise where panels sit, what shortcuts they use, what brush they prefer, what default settings they like. Every minute spent customising your workspace once saves you hours forever. Your workspace should fit your brain — not the other way around.
8
What if recognising these patterns in one tool makes learning every future tool dramatically faster?

REAL WORLD EXAMPLE
Once you have used one creative tool well, the next one is half-learned already. Why? Because you immediately know to look for the canvas, toolbar, panels, and menus. You instinctively try Ctrl+Z to undo. You search for layers. You drag, drop, zoom — the same gestures everywhere. People who fear new software usually have not learned this pattern. People who LOVE trying new tools have. The map of one workspace becomes the key to all of them. Pattern recognition is creative superpower number one.
Pro Connection
Professionals customise their workspaces for efficiency and save custom layouts. When switching to a new tool, they first identify: where’s the canvas? Where are the tools? Where are the panels? That pattern recognition is what makes professionals fast at learning new software.
PROFESSIONAL TERMINOLOGY
CLICK TO REVEAL and CLICK TO COVER
The complete interface layout of a creative tool — canvas, toolbars, panels, and menus
What is
WORKSPACE
The main working area where your design, image, or content lives
What is
CANVAS
The set of tools available for creating and manipulating elements
What is
TOOLBAR
A section of the interface displaying properties and settings: layers panel, colour panel, etc.
What is
PANEL
A horizontal representation of time used in video, animation, and presentation tools
What is
TIMELINE
A key combination that performs an action quickly (e.g., Ctrl/Cmd+Z = undo)
What is
KEYBOARD SHORTCUT
THE TOOL MAP
You're probably already a multi-category creative — you just haven't had a map to see the full territory of what you can already do.
what TO DO
List every creative tool or app you've ever used — phone camera, photo editor, Canva, iMovie, GarageBand, Google Slides, notes apps, anything counts.
Next to each tool, write its category: image editor, vector editor, layout tool, video editor, audio editor, 3D tool, or collaboration tool.
Identify which categories you're strongest in (you've used multiple tools there) and which you've never tried.
Choose one unexplored category and find a real, free tool that fits it — do a quick search if needed.
Optional: try creating something simple with that new tool this week.
what TO SUBMIT
Text | Your complete tool list with categories: '[Tool name] — [Category]' for each tool |
Text | 'My strongest category is [category] because [reason]. I have never tried [category]. One free tool I found for that category is [tool name] and it is used for [what it does].' |
1 Screenshot (optional) | Something you created with the new tool you explored |
CHALLENGE
DISCOVERY
You can use these SOFTWARES for this Discovery Challenge
FREE SOFTWARE : Canva, Sketchbook by Autodesk, Phone Screenshot, Snapseed
PAID SOFTWARE : Figma, Procreate Pocket